Sunday, April 7, 2013

Home-cooked Mac 'n Cheese

For my sister's home-coming (I haven't seen in her over a year and a half because she is stationed in Alaska and just did a tour in Afghanistan), I wanted to make one of her favs--home-cooked macaroni and cheese.

My recipe has evolved over the years, mainly because I am obsessed with the stuff and want to make it as yummilicious as possible. (Yes that's a word because I say it is.)

I started with my grandfather's basic recipe--elbow noodles, extra sharp cheddar cheese (hoop cheese if you're a big spender), eggs, milk, salt 'n pepper. I played around with the ratio of ingredients and came up with a pretty tasty concoction (very similar to my Papa's) that my of my friends and family consumed without complaint for years. But it still needed a little sumin' sumin'.

For a while, Brandon (the hubs) has been making sauces using a bechamel base (alfredo sauce, etc.) and we had sauced many a pasta with bechamel just. (This is a Mitch Hedburg reference. If you do not know who Mitch Hedburg is, shame on you. Stop reading this, and go Google him. Now...go on).

Any who, I figured since the bechamel seemed to make everything else delicious, it would make the mac 'n cheese more delicious as well. At Brandon's prompting, I attempted my new and improved mac 'n cheese recipe for the first time at Thanksgiving dinner last year. It was the bomb snappety if I say so myself.

So, this is the recipe I used to make my sister's Homecoming Home-cooked Mac 'n Cheese:

Bechamel Ingredients:

5 Tbsp. butter (or 7 Tbsp. margarine)
4 Tbsp. flour
3 C milk


The rest of the ingredients:

1 12-ounce package of elbow macaroni or rotini
4 eggs
1 lb of extra sharp cheddar cheese (buy the block, not the pre-shredded dried out cornstarch-laced stuff)


Instructions:

Preheat oven to 375 degrees.

Grate the cheese. Get a large pot of water, heavily salted, boiling.  Begin cooking your pasta to al dente.  While the pasta is cooking, prepare the bechamel.

Bechamel Instructions:
Melt the butter.  Stir in the flour.  Stir constantly under flour browns. (It will turn a caramel color and start to smell like movie popcorn. This take 2-3 minutes.)
Gradually add the milk, whisking as you pour.
Whisk frequently until sauce thickens and darkens.
This part takes about 5 minutes, but if you want a thicker sauce, just cook longer.
Once it is finished, turn to low.

Now comes the tricky part...
In a bowl, scramble the four eggs.
Temper in the bechamel sauce. (Slowly pour about a cup the bechamel into the eggs while continuously whisking. Then, slowly pour the eggs into the rest of the bechamel while continuously whisking.)

Add the grated cheese to the sauce.  If you wish, you can reserve a small amount to sprinkle on top.


After the pasta finishes cooking, drain and return to cooking pot.  Pour the sauce over the cooked pasta and stir until completely mixed.

Add salt and pepper to taste.


Spray a 9x13 baking pan with non-stick spray and pour the mixture into the pan.  If you reserved any cheese, sprinkle on top.

You can also sprinkle crushed Ritz crackers on top before baking.  My husband really likes adding the crackers but the rest of my family does not really care for them. So, on ours, I added crackers to a small portion.

Bake for 30 minutes or until warmed through and cheese is completely melted.

The Mac 'n Cheese post bake. (The left side isn't burnt--that's crumbled Ritz crackers.)
 Let stand for about 10 minutes before serving.

I hope you enjoy it as much as we did!

The next night, we got to watch the Braves win at Turner Field. Go Bravos!


Until next time...

Saturday, March 9, 2013

Copy Cat Tokyo Alley Noodle Salad

Almost nine years ago, one of the first dates Brandon and I went on was to Tokyo Alley in downtown Macon.  I was immediately addicted to the cold noodle salad that is served with each of the dishes.  For the past seven years, Brandon and I have occasionally tried to re-create the recipe but have not had much success until recently.  Last week, Brandon finally perfected it and oh man was it delicious!  We made one tweak that I think made it even better: we used whole wheat pasta. Throw in our sweet and spicy chicken to go with it (which is pretty similar to Tokyo Alley's sweet and hot chicken) and our scrumptious meal was complete.


If you would like to copy cat Tokyo Alley's noodle salad and sweet and hot chicken, here is what you will need:

Noodle Salad

1 box whole wheat pasta
1/2 tsp onion powder
1/2 tsp garlic powder
1/2 tsp finely ground celery seed
2 Tbsp milk
6 Tbsp miracle whip
salt and pepper

Boil water. Salt heavily. Cook pasta to al dente texture.  When pasta is finished cooking, drain and rinse with cold water.  Set to the side.

Whisk together miracle whip, milk, onion powder, garlic powder, ground celery seed, and salt and pepper.

Refrigerate sauce for approximately 15 minutes before mixing with pasta.  Mix pasta and sauce and refrigerate an additional 30 minutes.

Serve with slices of tomato and salt and pepper to taste.

Hot and spicy chicken

Chicken:
1 to 1 1/2 lbs boneless skinless chicken thighs
salt and pepper
1 tsp onion powder
1/2 tsp garlic powder

Slice each chicken thigh into four equal parts.  Season with salt and pepper, onion powder, and garlic powder.  Set to the side.

Sauce:
2 cups cold water
2 1/2 tsp arrow root or corn starch
2 Tbsp sriracha
1/2 cup splenda or sugar
1/2 tsp salt
1 Tbsp vinegar
1 1/2 Tbsp honey

Whisk together cold water and arrow root (or corn starch).  Put whisked together water and arrow root (or corn starch) on medium/high heat.  Whisk in the remaining ingredients.  Bring to boil.  Reduce to simmer for 5 minutes.  Set to side.

Saute chicken until almost done on medium/high heat.  Pour sauce over chicken and cook until sauce reaches desired consistency (at least 2 minutes).

Enjoy!

Until next time...

Monday, March 4, 2013

Sneaky Tofu Baked Penne

For some reason, when meat-eaters hear the word "tofu" they start start to make faces and sounds that suggest they have just heard the most disgusting thing imaginable. I'm not sure why my omnivore brothers and sisters are so scared of this little item, but they are. So, I decided to be sneaky...

I saw a recipe a while back that used tofu in stuffed shells. The author of the recipe said that the tofu would take on the consistency of ricotta. This got the gears a turnin' and I wondered if tofu would work in just a simple baked pasta. So, I gathered my ingredients:

Ingredients:
1 12 oz box of whole wheat pasta (I used penne)
1 block firm tofu
1 lb. ground turkey (I went with turkey sausage and it was perfect!)
1 8 oz package of shredded low-moisture part skim mozzarella cheese
2 jars of your favorite pasta sauce

Directions:
Preheat the oven to 425 degrees.
Bring a large pot of heavily salted water to a boil.  Once the water begins to boil, cook the pasta to "firm."
Brown the ground turkey.  When the turkey is fully cooked, add the two jars of pasta sauce.
Open the tofu and drain any excess moisture.  In a mixing bowl, mash up the tofu and stir in 1 cup (half the 8 oz. package) of mozzarella. Stir/mash until the tofu looks like ricotta cheese.
When the pasta is cooked, drain and return to pot.  Mix in the pasta sauce and turkey mixture.  Then mix in the tofu and mozzarella mixture.
Pour the mixture into a 9x11 baking sheet.  Top with the remaining 1 cup mozzarella.
Baked uncovered until the cheese is melted and the dish is warmed through.
Let sit for 5 minutes before serving.

It was halfway gone before I thought to take a picture!
My husband is a big meat eater and has never been a real big fan of tofu. He ate two big helpings and then went back for thirds a few hours later.

We took the leftovers to some friends' house and several people helped themselves.  When I sprung it on them that the "ricotta" was actually tofu they said they never would have guessed.

Needless to say, this much healthier baked pasta was a hit around our house and we will be making it again soon.

Until next time!

Monday, February 25, 2013

Whitney's "Hoot" of a Baby Shower

(First, as a disclaimer, please excuse the bad quality phone pictures in this post...)

One of my best friends, Whitney, is preggers with her first baby.
So cute!
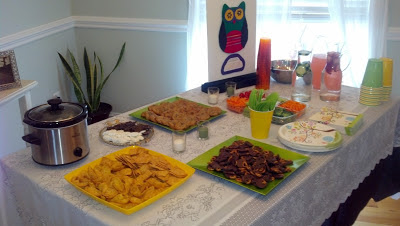
One of my other best friends, Danielle, and I wanted to throw Whitney a shower to express our love and excitement.  Whitney and her hubby have decided that they want baby's gender to be a surprise, which meant any showers needed to be boy and girl appropriate.  The nursery is nature themed and since owls are pretty hot right now we thought owls would be the way to go.

We keep the owl theme pretty constant throughout the shower...

We made a banner that said "Look Whooo's Having a Baby."


We sought "wise" advise for mommy and baby from shower attendees as well as their predictions for the little one.

We made little owl favors for everyone to take home.


And of course, no shower is complete with out delicious yums for everyone to stuff themselves.


I could have uncovered the food before I took a picture! Ugh!
I'd say the shower was very successful.  Mommy got lots of great gifts for baby and everyone had a good time socializing, seeing some faces we hadn't seen in a while, and meeting new friends.

Until next time...

Sunday, January 6, 2013

My easy peasy no-sew DIY curtains

Okay, I am really excited about this post. I love, Love, LOVE when I have success with something I find on Pinterest.


For way too long now we have needed some curtains in our living room, but let's be honest...curtains are stinkin' expensive!  So, I hit Pinterest (of course!) for some ideas on how to make curtains.  And, oh yeah, I needed it to be something I didn't have to sew since my machine is on the fritz.  I found several different tutorials for no-sew curtains and  I meshed together a couple to come up with my own flavor of no-sew curtains.

When I say these curtains were easy, I mean they were easy.  Now, that doesn't mean quick; just easy.

Here's what you need:
  1. Fabric (Measure your windows to see what length and width you need.  My windows are about 84 inches long, but I like to hang my curtain rod high, so I decided to use pieces that were 2 1/2 yards long; I actually had the lady at the fabric counter pre-cut the fabric into 2 1/2 yard pieces for me instead of just buying one 5 yard piece.)
  2. Scissors
  3. Stitch Witchery (You can find this is the fabric section at Walmart for around $2.  It looks like a roll of mesh tape.)
  4. An iron
  5. Ironing board
  6. Measuring tape
Start out by making sure that your pieces of fabric are the same length.  I just laid them on top of each other and then trimmed them up.

Next, put your first panel on the ironing board.  Start on one side and fold about a half inch seam.  Cut a strip of the Stitch Witchery and place it under the seam.  I had to do this part in several section because my fabric was so long.  Then, iron the seam with the Stitch Witchery underneath.  This part will probably take a little longer than you expect.  It takes about 60-90 seconds for the Stitch Witchery to seal.

What your seem should look like after using the Stitch Witchery
 Just repeat this process on all four sides of your fabric.

To double check, lay your pieces of fabric on top of each other again to make sure they line up evenly.

Purchase a couple of sets of curtain clip rings (can also be found at Walmart), attach them to your curtain rod, and you're in business.

Your finished product should look a little something like this:


I lucked up and found some great upholstery fabric for $1.50/yard, so my fabulous new curtains cost me a whopping $9.50! ($7.50 for the fabric + $2.00 for the Stitch Witchery.  If you count the curtain clips, throw in another $7.00, for a grand total of $16.50, which is still significantly cheaper than even one panel of a nice set of curtains.)

Up next (in a few days hopefully), fun with super old windows!  I found this beauty that someone had just thrown out, and it now has a new happy home on my dining room wall.  I have some great ideas about how to dress her up and I'll be posting an update on her progress soon.


Until next time...

Decorating like crazy...

Yet again, it has been way, way too long since I posted.  One of my New Year's resolutions is to post more regularly to my blog, so fingers crossed.

There has been A LOT going on around the Tolle House the past few months.  The holiday season always means lots of visiting with family, which is wonderful, but that doesn't leave time for much else.  So, I'm finally sitting down at my computer and writing this entry.

When we moved into our house two and a half years ago (whoa! doesn't seem that long ago), we didn't have much time to adjust or have a chance to get settled in.  I was studying for the bar exam (I feel sick even thinking about it!) and Brandon was working a job that kept him out of town 2-3 days per week.  We were lucky to just get our essentials unpacked.  Needless to say, between me starting work and Brandon continuing to have to work out of town for a while, pastoring our start-up church, and then beginning a second career as a teacher, there hasn't been much time for decorating in the interim either.  So, he and I vowed that we would spend at least one week of his Christmas break doing some much needed work around the house.

Last fall, we finally put paint on the walls that had been screaming for it since move-in day.  That made a BIG difference, but it barely scratched that itch I had to really make this house our home.  So, with a very limited budget, we set out this past week to "home-ize" our house.

Project #1:  The Master Bedroom

Our bedroom was one of the rooms that didn't get painted last fall and it has received very little attention in the decorating area.  I dug through a bunch of our decorative items in the garage (this process was aided by Brandon's building of some awesome storage shelves for the garage, which made organizing the garage a necessity).  I picked out a few items that we already had that weren't being utilized and turned them into something pretty cool.


I took the backing off of a frame, hung it on the wall, and put a plaque with scripture inside of the frame.  Above the frame, we hung our "Love Honor Cherish" sign. To finish things off, we hung a couple of candle sconces that my grandmother handed down to me a few months ago.

I think it turned out pretty nicely.


I also added a little bit of flare to our master bath, which had also been lacking any decoration since we moved in.  I tend to think of my garden tub as a nice place to escape from everything, so I wanted to make it a little bit more of an oasis.  I hung a couple of pictures and added some artificial flowers, all of which was previously utilized in our former apartment.  When paired with our monogrammed towels that I hung a while back, the tub now seems like a very peaceful place to escape.


I'm also very much wanting to blog about my recent no-sew curtain creation, but I think I'll put that in a separate entry.

Until next time...